Publishing from Local Files
Already have a Dash app written and ready to publish? This guide can help you take the app files on your workstation and turn them into a published app on Plotly Cloud.
There are two ways to publish from app files on your workstation: You can upload the files in the Cloud UI at cloud.plotly.com or you can publish directly from a Dash app running in debug mode. This guide covers both methods. Note that the file size limit is 80 MiB when uploading at cloud.plotly.com and 200 MiB when publishing from dev tools.
Not sure which publishing option is best for you?
The Publishing Playbook can help you choose the right publishing approach for your needs, from quick sharing to enterprise-scale solutions.
Preparing your app files
Plotly Cloud expects your app files to meet certain requirements. In this step, you'll review your files and make any adjustments needed to meet the requirements.
To prepare your app files:
-
Make sure that the total size of your files is less than 80 MiB if publishing at cloud.plotly.com, or less than 200 MiB if publishing from Dash dev tools.
-
(Optional) List your app dependencies in a
pyproject.tomlorrequirements.txtfile. Including one of these files lets Plotly Cloud know which dependencies to install for your app, but is not required in most cases. If you do not upload apyproject.tomlorrequirements.txtfile, Plotly Cloud will examine your app code and install the latest versions of the packages that it depends on. We recommend specifying dependencies inpyproject.tomlorrequirements.txtfile if at least one of the following is true:- Your app leverages features of these files (such as using
--extra-index-urlwithrequirements.txtto fetch a package from a private source). - At least one of your app dependencies needs to be pinned to a specific version that is not the latest.
- You want to ensure that the same dependency versions are used whenever you publish a new revision of your app (including new revisions that are automatically created when you apply a settings change).
Tip
You can generate a
requirements.txtbased on the Python packages present in a local environment where your app successfully runs (ideally a virtual environment dedicated to your app). To do this, activate the environment and then runpip freeze > requirements.txt. You can also check the environment's Python version withpython --version(you'll be asked to select a Python version in a later step). - Your app leverages features of these files (such as using
Publishing from the Cloud UI
Uploading your app files to Plotly Cloud
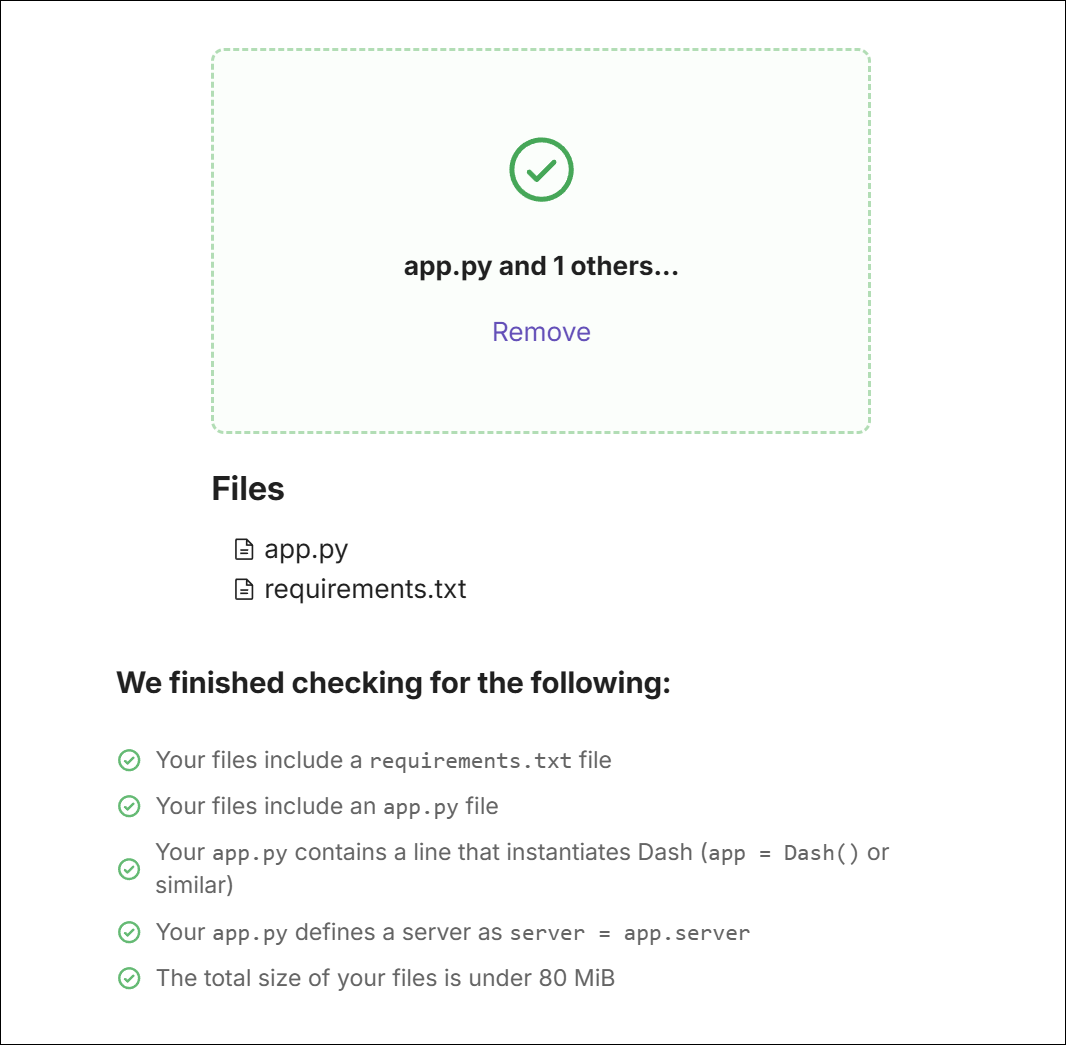
To upload your app files:
-
Go to Plotly Cloud: https://cloud.plotly.com/
-
Select New.
-
In a different window, browse to your app files. Multi-select the files and/or folders and then drag them to the upload area. Alternatively, if your app files are all in a single folder, you can select the upload area and then select your folder.
Plotly Cloud verifies that your files meet the requirements described above.
If you included a
pyproject.tomlorrequirements.txtfile, Plotly Cloud installs the specified dependencies. If not, Plotly Cloud examines your app code and installs the latest versions of the packages that the code depends on.If you accidentally upload unneeded folders like
.gitor.venv, they are omitted to reduce the final app size.If you forget some files or if you need to make further changes to meet the requirements, select Remove and then drag the new set of files.
Configuring general settings
Several options are available under Configuration:
-
Name: Identifies your app when you manage it on Plotly Cloud. You can change the automatically generated name to one that you prefer.
-
App URL: The unique URL where users will go to view the live app. You can change the default URL if you have a Plotly Pro plan (or higher).
-
Main file: Select the Python file that contains the Dash app definition.
-
Python version: The Python version that Plotly Cloud will use to build your app. App dependencies that you optionally specify in a
pyproject.tomlorrequirements.txtfile must be compatible with this Python version. -
Environment variables (optional): Values that your app code expects in the live app environment. For more information, see Environment Variables.
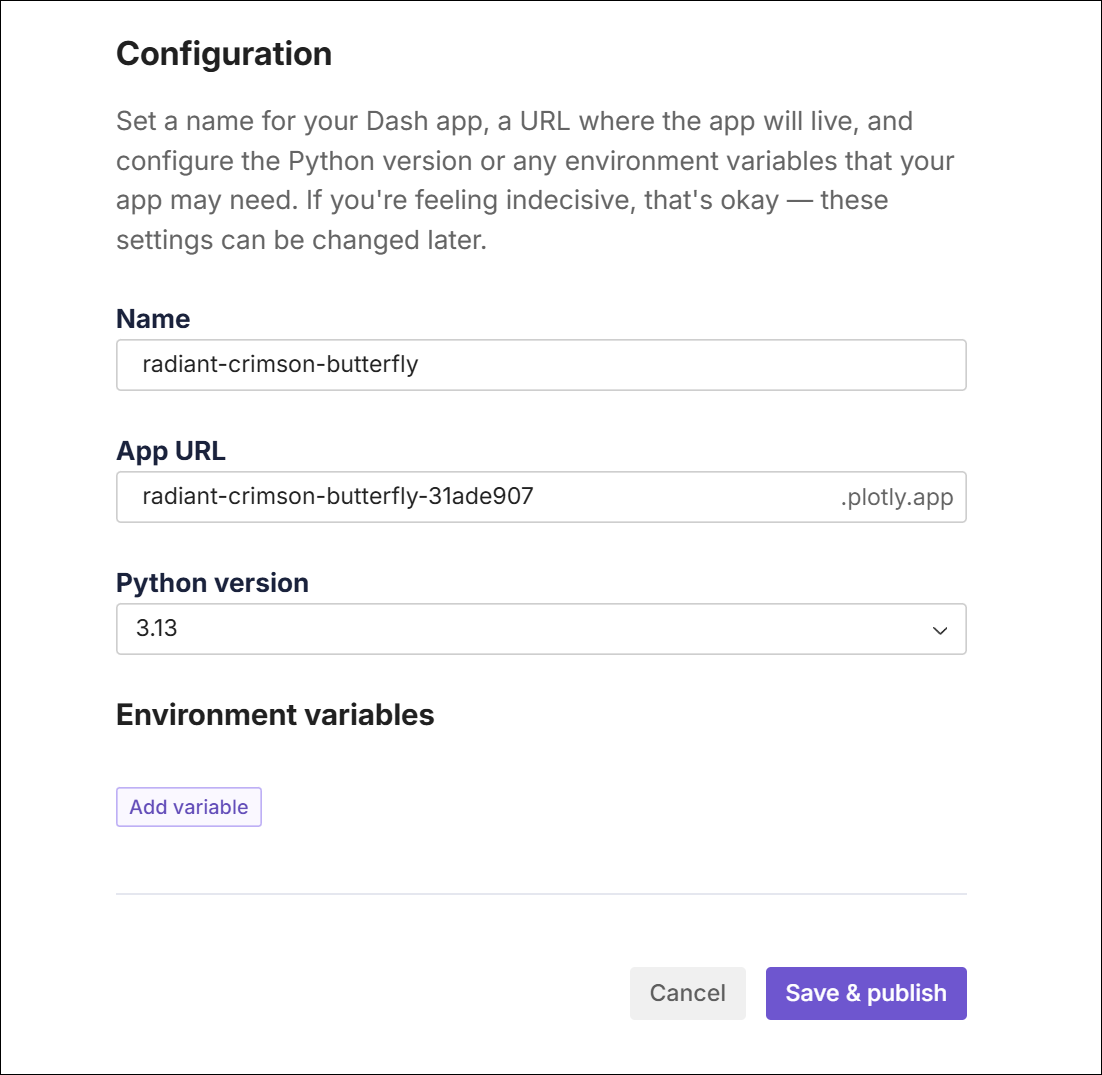
When everything looks good, select Save & publish.
You're taken to your apps list where you can monitor the status of your new app. If Plotly Cloud is able to successfully build and run your app, its status progresses to Running (you can follow along in the logs).
Select View in new tab ![]() to view the live app.
to view the live app.
Publishing from Dash dev tools
To publish your app from dev tools:
-
Install the Plotly Cloud extension:
pip install "dash[cloud]" -
Run your app in debug mode by setting
debug=Trueonapp.runin your app code:app.run(debug=True) -
Select Plotly Cloud in the dev tools UI and select Sign In.
-
Authenticate to Plotly Cloud in the browser tab that opens.
-
Return to your running Dash app in the browser, give the app a name, select the team you want to publish to, and select Publish App. Once your app builds and starts, you'll see an App is live message. Select View App to see it on Plotly Cloud.
Note
When publishing, the Plotly Cloud extension ignores virtual environments and Python cache files. Configure additional files or folders to ignore using a .gitignore file in your app folder.